Beam - Device Certificate Update
Each Beam system is implanted with a unique certificate at the time of creation. The certificate update process is typically pushed using the Beam infrastructure; however, a small subset of units did not receive the necessary update due to their status at the time of the release.
Below, you will find instructions for manually updating your Beam's certificates should your device be among the affected.
Please note: These instructions are intended for Beam Standard/Enhanced systems only and CANNOT be used for BeamPro devices.
Required Materials:
- • Computer with a stable internet connection
- • USB stick with minimum 4 GB
- • USB mouse and keyboard combo OR a USB mouse and a USB keyboard
- In the latter case, a USB hub will make the procedure easier since the Beam only has 2 USB ports
Step 1: Create a bootable USB stick
- Using your computer, download the Xubuntu 18.04.1 ISO image
- For your convenience, here's a direct link to the US mirror: http://mirror.us.leaseweb.net/ubuntu-cdimage/xubuntu/releases/18.04/release/xubuntu-18.04.1-desktop-amd64.iso
- Write a bootable USB Drive:
- Follow the link below for instructions for Windows, Ubuntu and Mac OS
Step 2: Delete Beam Certificates
- Remove the Beam from its charging dock
- Ensure your Beam is off by performing a Complete System Shutdown
- Insert the newly created USB drive into one of the USB ports
- Insert the mouse/keyboard combo in the other USB port
- If you don't have a mouse/keyboard combo, use a USB hub to connect both the keyboard and the mouse to the Beam. If you don’t have a USB hub, plug in the keyboard and switch it back and forth with the mouse as needed. Just make sure the USB stick always remains connected to the Beam.
- Power on the Beam by reconnecting it to its charging dock
- Immediately begin pressing the F7 key repeatedly until the following prompt appears:
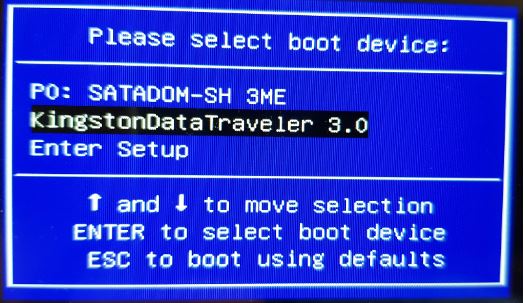
- You'll notice three menu items:
- PO: SATADOM-SH 3ME (Beam's internal drive)
- New USB Drive (Photo shows KingstonDataTraveler 3.0. Yours will likely differ)
- Enter Setup
- Immediately begin pressing the F7 key repeatedly until the following prompt appears:
- Highlight and select your USB drive
- If you do not see your drive in the list, begin again at step 1
- Within 30 seconds, you will notice the Xubuntu splash screen
- If the splash screen does not appear, begin again at step 1
- When the splash screen clears, the screen will display the following Xubuntu desktop options:
- Try Xubuntu OR
- Install Xubuntu
- Select Try Xubuntu
- This action will prompt a new Xubuntu desktop
- Double click the RPD-STORE icon
- Double click the config directory file
- When the file opens, right-click to select Open Terminal Here
- Within the terminal, enter the following command:
sudo rm device.pem - Press Enter when complete
- The completion of this step removes the Beam's certificate
- Press the Beam's power button
- When the "Log out Live session user" window appears, select Shut Down
- When instructed on-screen, remove the USB stick, then press Enter
- Remove your mouse/keyboard combo
- This will force the Beam to reboot independently
- A pairing key will display under the Connecting wheel
- Provide the pairing key to your Suitable Technologies Support representative to complete the pairing process
For additional information, email our Customer Success Department at This email address is being protected from spambots. You need JavaScript enabled to view it..